Thursday, October 25, 2012

Ubuntu 12.04 – install sun jdk 6-7


Ubuntu GNU/Linux 12.04 LTS (Precise Pangolin) released. I wanted to manually install the Sun JDK 6 and 7 on Ubuntu.
Installing Sun JDK 6 on Ubuntu 12.04:
  • Make the bin file executeable:
chmod +x jdk-6u32-linux-x64.bin
  • Extract the bin file:
./jdk-6u32-linux-x64.bin
  • Move extracted folder to this location:
sudo mv jdk1.6.0_32 /usr/lib/jvm/
  • Install new java source in system:
sudo update-alternatives --install /usr/bin/javac javac /usr/lib/jvm/jdk1.6.0_32/bin/javac 1
sudo update-alternatives --install /usr/bin/java java /usr/lib/jvm/jdk1.6.0_32/bin/java 1
sudo update-alternatives --install /usr/bin/javaws javaws /usr/lib/jvm/jdk1.6.0_32/bin/javaws 1
  • Choose default java:
sudo update-alternatives --config javac
sudo update-alternatives --config java
sudo update-alternatives --config javaws
  • java version test:
java -version
  • Verify the symlinks all point to the new java location:
ls -la /etc/alternatives/java*
  • Enable Java plugin for Mozilla Firefox (even for Chrome)
#for 64-Bit jdk
sudo ln -s /usr/lib/jvm/jdk1.6.0_32/jre/lib/amd64/libnpjp2.so /usr/lib/mozilla/plugins
#for 32-Bit jdk
sudo ln -s /usr/lib/jvm/jdk1.6.0_32/jre/lib/i386/libnpjp2.so /usr/lib/mozilla/plugins
Installing Sun JDK 7 on Ubuntu 12.04:
  • Download the sun jdk 7 tar file from here
  • Extract the tar file:
tar -xvzf jdk-7u4-linux-x64.tar.gz
  • Move extracted folder to this location:
sudo mv jdk1.7.0_04 /usr/lib/jvm/
  • Install new java source in system:
sudo update-alternatives --install /usr/bin/javac javac /usr/lib/jvm/jdk1.7.0_04/bin/javac 1
sudo update-alternatives --install /usr/bin/java java /usr/lib/jvm/jdk1.7.0_04/bin/java 1
sudo update-alternatives --install /usr/bin/javaws javaws /usr/lib/jvm/jdk1.7.0_04/bin/javaws 1
  • Choose default java:
sudo update-alternatives --config javac
sudo update-alternatives --config java
sudo update-alternatives --config javaws
  • java version test:
java -version
  • Verify the symlinks all point to the new java location:
ls -la /etc/alternatives/java*
  • Enable Java plugin for Mozilla Firefox (even for Chrome)
#for 64-Bit jdk
sudo ln -s /usr/lib/jvm/jdk1.7.0_04/jre/lib/amd64/libnpjp2.so /usr/lib/mozilla/plugins
#for 32-Bit jdk
sudo ln -s /usr/lib/jvm/jdk1.7.0_04/jre/lib/i386/libnpjp2.so /usr/lib/mozilla/plugins
Update: I have added Java Web Start configuration (Thanks Jack).
Update: I have added Java Plugin configuration for Mozilla Firefox even for Chrome (Thanks shetty).
Update: JAVA_HOME configuration: Some tools require JAVA_HOME variable. You can set JAVA_HOME in Ubuntu so simple: Edit the file .bashrc under your home directory and add the following lines: (if .bashrc is hidden click in Nautilus Menu View > Show Hidden Files)
export JAVA_HOME=/path/your/jdk
export PATH=$JAVA_HOME/bin:$PATH

Installing Wine IN UBUNTU 12.04


You’ll find Wine available in the Ubuntu Software Center. Both stable and beta versions are available — here, version 1.2 is stable and version 1.3 is beta. The stable version is more tested — sometimes, a regression in the beta version can cause an application to stop working, but some applications will only work with the newer, beta version. An application’s entry in the Wine application database sometimes contains information about the necessary version of Wine you’ll need.

Running an Application

Once you’ve got Wine installed, you can download an application’s EXE or MSI (Microsoft Installer) file and double-click it — just like you would if you were using Windows — to run it with Wine.
This isn’t always the best way to run an application. If you’re encountering a problem, you can run the application from the terminal to see detailed error messages that can help you troubleshoot the problem. Just use the following command:
wine /path/to/application.exe
If you have an MSI file instead, use the following command to install it:
wine msiexec /i /path/to/installer.msi
Bear in mind that many of the error messages don’t matter. For example, the fixme message here indicates that Wine doesn’t contain support for a specific function yet, but the application runs fine without this function.
If the application requires installation, install it as if you were using Windows.
Once it’s installed, you’ll find its shortcuts in your applications menu, and possibly on your desktop.

Wine’s Utilities

The Wine package comes with a few utilities, which you can access from the applications menu. Just type Wine in the application menu to search for them.
Wine’s configuration dialog contains a variety of options, some of which you may need to get applications working. You can set the Windows version Wine behaves as, or set specific Windows versions for each individual applicaiton. Other options include graphics, audio and theming settings.
The Uninstall Wine Software utility lists your installed software and allows you to remove programs.
The package also includes Winetricks, a helper script that automates some tasks. Winetracks can guide you through installing certain popular applications and games — you won’t find every supported application here, though.

The Registry & File System

Many applications require registry tweaks to work properly. You’ll often find information about which registry entries to modify on the application database. Execute the regedit command from a terminal to access Wine’s registry editor.
Wine uses a virtual Windows file system, which is stored in the hidden .wine folder in your home folder. Use the View -> Show Hidden Files option in the file manager to reveal it. Once you have, you’ll find a folder nameddrive_c in the .wine folder — this folder contains the contents of Wine’s C: drive.

Fun, geeky fact: Wine stands for “Wine is not a Windows emulator.” It doesn’t emulate Windows; it’s an implementation of the Windows API for Linux, Mac OS X, Solaris and the BSD family of operating systems.

Monday, October 22, 2012

All Windows XP & 7 Command Prompt Commands


All Windows XP & 7  Command Prompt Commands

   ADDUSERS Add or list users to/from a CSV file
   ADmodcmd Active Directory Bulk Modify
   ARP      Address Resolution Protocol
   ASSOC    Change file extension associations•
   ASSOCIAT One step file association
   ATTRIB   Change file attributes
b
   BCDBOOT  Create or repair a system partition
   BCDEDIT  Manage Boot Configuration Data
   BITSADMIN Background Intelligent Transfer Service
   BOOTCFG  Edit Windows boot settings
   BROWSTAT Get domain, browser and PDC info
c
   CACLS    Change file permissions
   CALL     Call one batch program from another•
   CERTREQ  Request certificate from a certification authority
   CD       Change Directory - move to a specific Folder•
   CHANGE   Change Terminal Server Session properties
   CHKDSK   Check Disk - check and repair disk problems
   CHKNTFS  Check the NTFS file system
   CHOICE   Accept keyboard input to a batch file
   CIPHER   Encrypt or Decrypt files/folders
   CleanMgr Automated cleanup of Temp files, recycle bin
   CLEARMEM Clear memory leaks
   CLIP     Copy STDIN to the Windows clipboard
   CLS      Clear the screen•
   CLUSTER  Windows Clustering
   CMD      Start a new CMD shell
   CMDKEY   Manage stored usernames/passwords
   COLOR    Change colors of the CMD window•
   COMP     Compare the contents of two files or sets of files
   COMPACT  Compress files or folders on an NTFS partition
   COMPRESS Compress individual files on an NTFS partition
   CON2PRT  Connect or disconnect a Printer
   CONVERT  Convert a FAT drive to NTFS
   COPY     Copy one or more files to another location•
   CSCcmd   Client-side caching (Offline Files)
   CSVDE    Import or Export Active Directory data 
d
   DATE     Display or set the date•
   DEFRAG   Defragment hard drive
   DEL      Delete one or more files•
   DELPROF  Delete user profiles
   DELTREE  Delete a folder and all subfolders
   DevCon   Device Manager Command Line Utility 
   DIR      Display a list of files and folders•
   DIRUSE   Display disk usage
   DISKPART Disk Administration
   DISKSHADOW Volume Shadow Copy Service
   DNSSTAT  DNS Statistics
   DOSKEY   Edit command line, recall commands, and create macros
   DriverQuery Display installed device drivers
   DSACLs   Active Directory ACLs
   DSAdd    Add items to active directory (user group computer) 
   DSGet    View items in active directory (user group computer)
   DSQuery  Search for items in active directory (user group computer)
   DSMod    Modify items in active directory (user group computer)
   DSMove   Move an Active directory Object
   DSRM     Remove items from Active Directory
e
   ECHO     Display message on screen•
   ENDLOCAL End localisation of environment changes in a batch file•
   ERASE    Delete one or more files•
   EVENTCREATE Add a message to the Windows event log
   EXIT     Quit the current script/routine and set an errorlevel•
   EXPAND   Uncompress files
   EXTRACT  Uncompress CAB files
f
   FC       Compare two files
   FIND     Search for a text string in a file
   FINDSTR  Search for strings in files
   FOR /F   Loop command: against a set of files•
   FOR /F   Loop command: against the results of another command•
   FOR      Loop command: all options Files, Directory, List•
   FORFILES Batch process multiple files
   FORMAT   Format a disk
   FREEDISK Check free disk space (in bytes)
   FSUTIL   File and Volume utilities
   FTP      File Transfer Protocol
   FTYPE    File extension file type associations•
g
   GETMAC   Display the Media Access Control (MAC) address
   GLOBAL   Display membership of global groups
   GOTO     Direct a batch program to jump to a labelled line•
   GPRESULT Display Resultant Set of Policy information
   GPUPDATE Update Group Policy settings
h
   HELP     Online Help
i
   iCACLS   Change file and folder permissions
   IF       Conditionally perform a command•
   IFMEMBER Is the current user a member of a Workgroup
   IPCONFIG Configure IP
k
   KILL     Remove a program from memory
l
   LABEL    Edit a disk label
   LOCAL    Display membership of local groups
   LOGEVENT Write text to the event viewer
   LOGMAN   Manage Performance Monitor
   LOGOFF   Log a user off
   LOGTIME  Log the date and time in a file
m
   MAPISEND Send email from the command line
   MBSAcli  Baseline Security Analyzer
   MEM      Display memory usage
   MD       Create new folders•
   MKLINK   Create a symbolic link (linkd)
   MODE     Configure a system device
   MORE     Display output, one screen at a time
   MOUNTVOL Manage a volume mount point
   MOVE     Move files from one folder to another•
   MOVEUSER Move a user from one domain to another
   MSG      Send a message
   MSIEXEC  Microsoft Windows Installer
   MSINFO32 System Information
   MSTSC    Terminal Server Connection (Remote Desktop Protocol)
   MV       Copy in-use files
n
   NET      Manage network resources
   NETDOM   Domain Manager
   NETSH    Configure Network Interfaces, Windows Firewall & Remote access
   NETSVC   Command-line Service Controller
   NBTSTAT  Display networking statistics (NetBIOS over TCP/IP)
   NETSTAT  Display networking statistics (TCP/IP)
   NOW      Display the current Date and Time 
   NSLOOKUP Name server lookup
   NTBACKUP Backup folders to tape
   NTRIGHTS Edit user account rights
o
   OPENFILES Query or display open files
p
   PATH     Display or set a search path for executable files•
   PATHPING Trace route plus network latency and packet loss
   PAUSE    Suspend processing of a batch file and display a message•
   PERMS    Show permissions for a user
   PERFMON  Performance Monitor
   PING     Test a network connection
   POPD     Return to a previous directory saved by PUSHD•
   PORTQRY  Display the status of ports and services
   POWERCFG Configure power settings
   PRINT    Print a text file
   PRINTBRM Print queue Backup/Recovery
   PRNCNFG  Display, configure or rename a printer
   PRNMNGR  Add, delete, list printers set the default printer
   PROMPT   Change the command prompt•
   PsExec     Execute process remotely
   PsFile     Show files opened remotely
   PsGetSid   Display the SID of a computer or a user
   PsInfo     List information about a system
   PsKill     Kill processes by name or process ID
   PsList     List detailed information about processes
   PsLoggedOn Who's logged on (locally or via resource sharing)
   PsLogList  Event log records
   PsPasswd   Change account password
   PsPing     Measure network performance
   PsService  View and control services
   PsShutdown Shutdown or reboot a computer
   PsSuspend  Suspend processes
   PUSHD    Save and then change the current directory•
q
   QGREP    Search file(s) for lines that match a given pattern
   Query Process    Display processes (TS/Remote Desktop)
   Query Session    Display all sessions (TS/Remote Desktop)
   Query TermServer List all servers (TS/Remote Desktop)
   Query User       Display user sessions (TS/Remote Desktop)
r
   RASDIAL  Manage RAS connections
   RASPHONE Manage RAS connections
   RECOVER  Recover a damaged file from a defective disk
   REG      Registry: Read, Set, Export, Delete keys and values
   REGEDIT  Import or export registry settings
   REGSVR32 Register or unregister a DLL
   REGINI   Change Registry Permissions
   REM      Record comments (remarks) in a batch file•
   REN      Rename a file or files•
   REPLACE  Replace or update one file with another
   Reset Session  Delete a Remote Desktop Session
   RD       Delete folder(s)•
   RMTSHARE Share a folder or a printer
   ROBOCOPY Robust File and Folder Copy
   ROUTE    Manipulate network routing tables
   RUN      Start | RUN commands
   RUNAS    Execute a program under a different user account
   RUNDLL32 Run a DLL command (add/remove print connections)

s
   SC       Service Control
   SCHTASKS Schedule a command to run at a specific time
   SCLIST   Display Services
   SET      Display, set, or remove session environment variables•
   SETLOCAL Control the visibility of environment variables•
   SETX     Set environment variables
   SFC      System File Checker 
   SHARE    List or edit a file share or print share
   ShellRunAs Run a command under a different user account
   SHIFT    Shift the position of batch file parameters•
   SHORTCUT Create a windows shortcut (.LNK file)
   SHOWGRPS List the Workgroups a user has joined
   SHOWMBRS List the Users who are members of a Workgroup
   SHUTDOWN Shutdown the computer
   SLEEP    Wait for x seconds
   SLMGR    Software Licensing Management (Vista/2008)
   SOON     Schedule a command to run in the near future
   SORT     Sort input
   START    Start a program, command or batch file•
   SU       Switch User
   SUBINACL Edit file and folder Permissions, Ownership and Domain
   SUBST    Associate a path with a drive letter
   SYSTEMINFO List system configuration
t
   TAKEOWN  Take ownership of a file
   TASKLIST List running applications and services
   TASKKILL Remove a running process from memory
   TIME     Display or set the system time•
   TIMEOUT  Delay processing of a batch file
   TITLE    Set the window title for a CMD.EXE session•
   TLIST    Task list with full path
   TOUCH    Change file timestamps    
   TRACERT  Trace route to a remote host
   TREE     Graphical display of folder structure
   TSSHUTDN Remotely shut down or reboot a terminal server
   TYPE     Display the contents of a text file•
   TypePerf Write performance data to a log file
u
   USRSTAT  List domain usernames and last login
v
   VER      Display version information•
   VERIFY   Verify that files have been saved•
   VOL      Display a disk label•
w
   WAITFOR  Wait for or send a signal
   WHERE    Locate and display files in a directory tree
   WHOAMI   Output the current UserName and domain
   WINDIFF  Compare the contents of two files or sets of files
   WINMSDP  Windows system report
   WINRM    Windows Remote Management
   WINRS    Windows Remote Shell
   WMIC     WMI Commands
   WUAUCLT  Windows Update
x
   XCACLS   Change file and folder permissions
   XCOPY    Copy files and folders
   ::       Comment / Remark•

Thursday, October 18, 2012

Global Positioning System (GPS) History


What is GPS?

satellite
The Global Positioning System (GPS) is a satellite-based navigation system made up of a network of 24 satellites placed into orbit by the U.S. Department of Defense. GPS was originally intended for military applications, but in the 1980s, the government made the system available for civilian use. GPS works in any weather conditions, anywhere in the world, 24 hours a day. There are no subscription fees or setup charges to use GPS.

How it works

GPS satellites circle the earth twice a day in a very precise orbit and transmit signal information to earth. GPS receivers take this information and use triangulation to calculate the user's exact location. Essentially, the GPS receiver compares the time a signal was transmitted by a satellite with the time it was received. The time difference tells the GPS receiver how far away the satellite is. Now, with distance measurements from a few more satellites, the receiver can determine the user's position and display it on the unit's electronic map.
GPS Screens
A GPS receiver must be locked on to the signal of at least three satellites to calculate a 2D position (latitude and longitude) and track movement. With four or more satellites in view, the receiver can determine the user's 3D position (latitude, longitude and altitude). Once the user's position has been determined, the GPS unit can calculate other information, such as speed, bearing, track, trip distance, distance to destination, sunrise and sunset time and more.

How accurate is GPS?

Today's GPS receivers are extremely accurate, thanks to their parallel multi-channel design. Garmin's 12 parallel channel receivers are quick to lock onto satellites when first turned on and they maintain strong locks, even in dense foliage or urban settings with tall buildings. Certain atmospheric factors and other sources of error can affect the accuracy of GPS receivers. Garmin® GPS receivers are accurate to within 15 meters on average.
GPS Signals
Newer Garmin GPS receivers with WAAS (Wide Area Augmentation System) capability can improve accuracy to less than three meters on average. No additional equipment or fees are required to take advantage of WAAS. Users can also get better accuracy with Differential GPS (DGPS), which corrects GPS signals to within an average of three to five meters. The U.S. Coast Guard operates the most common DGPS correction service. This system consists of a network of towers that receive GPS signals and transmit a corrected signal by beacon transmitters. In order to get the corrected signal, users must have a differential beacon receiver and beacon antenna in addition to their GPS.
Satellite Diagram

The GPS satellite system

The 24 satellites that make up the GPS space segment are orbiting the earth about 12,000 miles above us. They are constantly moving, making two complete orbits in less than 24 hours. These satellites are travelling at speeds of roughly 7,000 miles an hour.
GPS satellites are powered by solar energy. They have backup batteries onboard to keep them running in the event of a solar eclipse, when there's no solar power. Small rocket boosters on each satellite keep them flying in the correct path.
Here are some other interesting facts about the GPS satellites (also called NAVSTAR, the official U.S. Department of Defense name for GPS):
  • The first GPS satellite was launched in 1978.
  • A full constellation of 24 satellites was achieved in 1994.
  • Each satellite is built to last about 10 years. Replacements are constantly being built and launched into orbit.
  • A GPS satellite weighs approximately 2,000 pounds and is about 17 feet across with the solar panels extended.
  • Transmitter power is only 50 watts or less.

What's the signal?

GPS satellites transmit two low power radio signals, designated L1 and L2. Civilian GPS uses the L1 frequency of 1575.42 MHz in the UHF band. The signals travel by line of sight, meaning they will pass through clouds, glass and plastic but will not go through most solid objects such as buildings and mountains.
A GPS signal contains three different bits of information - a pseudorandom code, ephemeris data and almanac data. The pseudorandom code is simply an I.D. code that identifies which satellite is transmitting information. You can view this number on your Garmin GPS unit's satellite page, as it identifies which satellites it's receiving.
Ephemeris data, which is constantly transmitted by each satellite, contains important information about the status of the satellite (healthy or unhealthy), current date and time. This part of the signal is essential for determining a position.
The almanac data tells the GPS receiver where each GPS satellite should be at any time throughout the day. Each satellite transmits almanac data showing the orbital information for that satellite and for every other satellite in the system.
Blocked Signal Diagram

Sources of GPS signal errors

Factors that can degrade the GPS signal and thus affect accuracy include the following:
  • Ionosphere and troposphere delays - The satellite signal slows as it passes through the atmosphere. The GPS system uses a built-in model that calculates an average amount of delay to partially correct for this type of error.
  • Signal multipath - This occurs when the GPS signal is reflected off objects such as tall buildings or large rock surfaces before it reaches the receiver. This increases the travel time of the signal, thereby causing errors.
  • Receiver clock errors - A receiver's built-in clock is not as accurate as the atomic clocks onboard the GPS satellites. Therefore, it may have very slight timing errors.
  • Orbital errors - Also known as ephemeris errors, these are inaccuracies of the satellite's reported location.
  • Number of satellites visible - The more satellites a GPS receiver can "see," the better the accuracy. Buildings, terrain, electronic interference, or sometimes even dense foliage can block signal reception, causing position errors or possibly no position reading at all. GPS units typically will not work indoors, underwater or underground.
  • Satellite geometry/shading - This refers to the relative position of the satellites at any given time. Ideal satellite geometry exists when the satellites are located at wide angles relative to each other. Poor geometry results when the satellites are located in a line or in a tight grouping.
  • Intentional degradation of the satellite signal - Selective Availability (SA) is an intentional degradation of the signal once imposed by the U.S. Department of Defense. SA was intended to prevent military adversaries from using the highly accurate GPS signals. The government turned off SA in May 2000, which significantly improved the accuracy of civilian GPS receivers.

25 Things I did After Installing Ubuntu 12.04 LTS


Ubuntu 12.04 LTS "Precise Pangolin" is proving everyone wrong. It is perhaps the most loved Ubuntu release since "Lucid Lynx". Unity is now an almost-finished product. The rock solid nature of Ubuntu 12.04 LTS along with bold moves such as the introduction of features like HUD is winning the hearts and minds of geeks and normal-users alike. Here are the things you could do after installing Ubuntu 12.04 to make it an even more useful and finished OS.

things to do after installing Ubuntu 12.04 LTS

Top Things To Do After Installing Ubuntu 12.04 Precise Pangolin
I know, it's late. Usually I come up with this post as and when a new major Ubuntu release happens, which has proved helpful to hundreds of thousands of newbie Ubuntu users to get things rolling in an otherwise alien world. Because of reasons you all know by now, I was not able do it this time around, till now. And since it's already late, I have decided to elaborate the article even further by including  every bit of information I could collect regarding the things you could do in Ubuntu 12.04 LTS after installing. So here is it.
First Things First - Installing Restricted Extras During Installation
  • Starting from Ubuntu 11.04 release, you can install restricted codecs package (which include Adobe Flash, MP3 codecs and such) during installation of Ubuntu OS itself.
top things to do After Installing Ubuntu 12.04 precise pangolin
  • Notice the arrows pointing to the boxes in the screenshot above. If you tick both of them during the Ubuntu installation process (make sure you are connected to the internet before doing so), restricted extras package will be installed automatically and you will be able to play mp3's, avi's, mp4's etc. and watch flash videos (YouTube videos for example) right after Ubuntu installation is done with.
  • But there is a catch. If you have a slow internet connection (which is very rare these days), ticking the boxes shown in the screenshot above will unnecessarily lengthen the installation process. I for one prefer to do all that after installing Ubuntu. If you are like me, the next two steps are for you.
Update Repositories
  • After you install brand new Ubuntu 12.04, the first thing you need to do is to update repositories and make sure you have the latest updates installed (Like I said before, you need to do this only if you haven't ticked the boxes shown in the above screenshot).
ubuntu 12.04 things to do after installation
  • Search for Update Manager in Unity Dash and launch the Update Manager app. Check for updates available and install them if any. 
  • OR you can do this entirely using command line. Open Terminal (Ubuntu 12.04 Keyboard Shortcut: Ctrl + Alt + T) and copy-paste the following command into Terminal.
sudo apt-get update && sudo apt-get upgrade
  • Done. Ubuntu repositories have been successfully updated. 
Install Ubuntu Restricted Extras
  • Install the "ubuntu-restricted-extras" package. This will enable your Ubuntu to play popular file formats like mp3, avi, flash videos etc. CLICK HERE (to install directly fromUbuntu Software Center) OR simply copy-paste the following command into Terminal to install the package (You need not do this if you have ticked the 'right' boxes before).
sudo apt-get install ubuntu-restricted-extras
  • Done.
Enable Full DVD Playback in Ubuntu 12.04 LTS
  • Though installing the restricted extras package will solve most of your problems, you may not be able to play dual layer dvds yet in your Ubuntu. Most commercial DVDs are encrypted with CSS (the Content Scrambling System), which attempts to restrict the software that can play a DVD. 
  • For that, you need to install libdvdcss2 package from medibuntu repositories. Simply copy-paste the following commands into Terminal.
sudo wget --output-document=/etc/apt/sources.list.d/medibuntu.list http://www.medibuntu.org/sources.list.d/$(lsb_release -cs).list && sudo apt-get --quiet update && sudo apt-get --yes --quiet --allow-unauthenticated install medibuntu-keyring && sudo apt-get --quiet update
sudo apt-get install libdvdcss2
  • Let the process complete, might take some time. 
Check for Availability of Proprietary Hardware Drivers

drivers for ubuntu 12.04
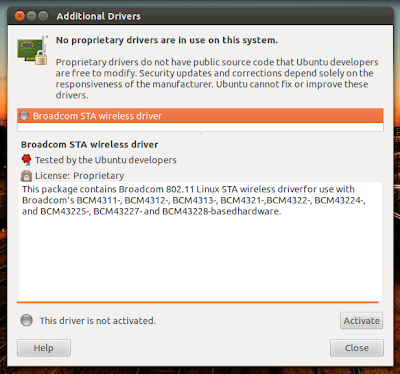
  • In my case, all the hardware drivers including graphics, sound and wireless drivers were enabled automatically (though, as you can see, I still have a proprietary wireless driver on offer, which I have not activated). But this may not be the case for everyone.
additional drivers for ubuntu 12.04 LTS
  • If you are among the not-so-lucky, open Unity dash (Ubuntu 12.04 Keyboard Shortcut:Super key) and search for 'Additional Drivers' application.
    • Check for additional drivers available and activate the ones you want. In 90% of the cases, this will do the trick. Those who were not able to get their hardware drivers enabled yet will have to do a fair amount of digging through ubuntuforums.
    Enable 'Show Remaining Space Left' Option in Nautilus File Browser

    things to do after installing Ubuntu 12.04 LTS
    • Status bar towards the bottom of the Nautilus window shows not only the amount of free space left in the drive but also the number of items in that particular drive/folder. This is a simple yet very useful feature. Do the following to enable it.
    • Open Nautilus file browser. Go to View - Statusbar. Enable it and you're done.
    Calculator Lens/Scope for Ubuntu 12.04 

    howto install Calculator Lens/Scope for Ubuntu 12.04
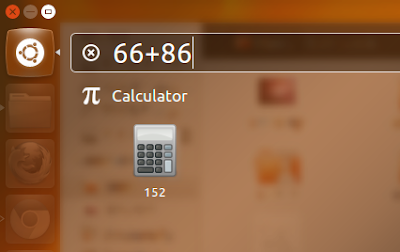
    • Calculator Lens/Scope for Unity Dash. Do the following to install it in Ubuntu 12.04.
    sudo add-apt-repository ppa:scopes-packagers/ppa
    sudo apt-get update
    sudo apt-get install unity-lens-utilities unity-scope-calculator
    • Done. Log out and log back in (OR hit Alt + F2, type unity --replace and press Enter) .
    Unity Cities Lens/Scope for Ubuntu 12.04

    howto install Unity Cities Lens/Scope for ubuntu 12.04
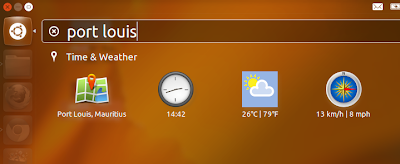
    • Unity Cities lens/scope for Ubuntu 12.04 is nifty. You just have to open up Dash and type in the city of your choice. It will show you the map, time, temperature and even the wind-speed right in your Unity Dash.
    • And it is available in the same PPA as above (Calculator Lens). So if you have already installed Calculator Lens from scopes-packagers PPA, all you need to do is this:
    sudo apt-get install unity-scope-cities
    • Done. Log out and log back in.
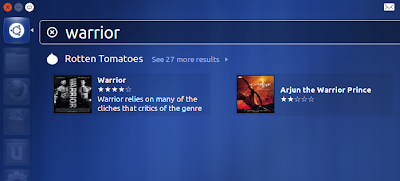
    Install Rotten Tomatoes Lens/Scope for Instant Movie Reviews

    rotten tomatoes movie review lens/scope for ubuntu 12.04 unity
    • If you are a movie buff like me, this one is for you. This particular Unity Lens allows you to search for movie reviews directly from Unity Dash. 
    • Only if this Lens/Scope could show data from IMDB.com as well.
    • Again, it is available in the same PPA as above (Calculator Lens). So if you have already installed Calculator Lens from scopes-packagers PPA, do the following in Terminal (otherwise, you have to run the first two commands as above).
    sudo apt-get install unity-scope-rottentomatoes
    • Done. More Unity Lenses/Scopes can be found here.
    Change Launcher Behavior, Size

    things to do after installing Ubuntu 12.04 LTS
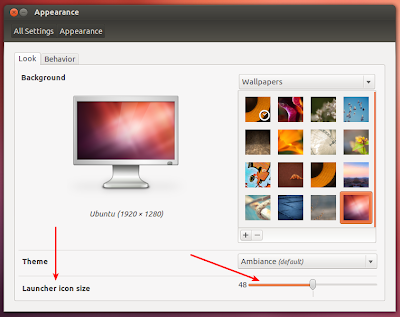
    • No need for third-party apps to do very basic stuff like changing Launcher icon size, behavior etc. You can now do all of that directly from Appearance window.
    • Right click on the desktop, select Change Desktop Background and Appearance window will pop up. You know what to do (see screenshot above).
    Install MyUnity, Packed with Tons of Useful Ubuntu 12.04 Tweaks

    things to do after installing Ubuntu 12.04 LTS
    • CLICK HERE to install MyUnity in Ubuntu 12.04 LTS.
    • OR copy-paste the following into Terminal.
    sudo apt-get install myunity
    • Done.
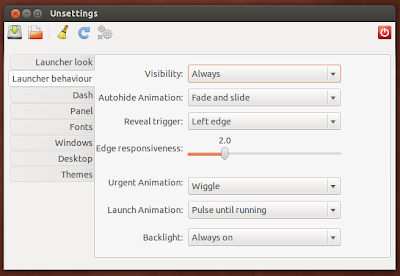
    Install Unsettings, More Ubuntu 12.04 Tweaking Options, Simpler UI

    things to do after installing Ubuntu 12.04 precise pangolin
    • Unsettings is a newer application with similar tweaking options as MyUnity. More importantly, it has a useful 'Reset to Default' option.
    • Though unlike MyUnity, it is not available in default Ubuntu repositories. Copy-paste the following commands into Terminal to install Unsettings in Ubuntu 12.04.
    sudo add-apt-repository ppa:diesch/testing
    sudo apt-get update
    sudo apt-get install unsettings
    • Done.
    Ubuntu Tweak: The Most Comprehensive of Them All

    top things to do after installing Ubuntu 12.04 LTS
    • Ubuntu Tweak is undoubtedly the most comprehensive tweaking tool for Ubuntu.
    • Apart from the usual Unity related tweaks, Ubuntu Tweak has a number of other options like a fully functioning Software Center, huge array of scripts to choose from, Computer Janitor to free up space etc. to name a few.
    • Do the following in Terminal to install Ubuntu Tweak.
    sudo add-apt-repository ppa:tualatrix/ppa
    sudo apt-get update
    sudo apt-get install ubuntu-tweak
    • Done.
    Install Open in Terminal Nautilus Extension

    open in terminal nautilus extension
    • This extension adds a very useful 'open in Terminal' option to Nautilus right click menu.
    • CLICK HERE to install extension directly from Ubuntu Software Center.
    • Log out and log back in to enable it (OR hit Alt + F2, type nautilus -q and press ENTER).
    • And you're done.
    Change Panel Transparency

    things to do after installing Ubuntu 12.04 LTS
    • I like my Unity's top panel to be semi-transparent.
    • In MyUnity, just goto Panel settings to change its transparency.
    • As you can see, there is also a 'Transparency maximized toggle' option. When it is set to ON, Panel transparency will be OFF for maximized windows. Very nice hack.
    Enable Workspace Screen Edge Actions

    things to do after installing Ubuntu 12.04 LTS
    • This is one of my favorite features which can be enabled/modified easily using Ubuntu Tweak. What it does is, you can set each corner of your workspace to do different tasks (which you can choose) on mouse hover action.
    • Launch Ubuntu Tweak. Goto Tweaks - Workspace.
    Install Weather Indicator Applet

    weather indicator applet ubuntu 12.04
    • CLICK HERE to install Weather Indicator Applet in Ubuntu 12.04 LTS.
    • After installation, search for weather indicator in Unity Dash and launch the Applet.
    Install CPU/Memory Indicator Applet

    cpu usage indicator ubuntu 12.04
    • Useful CPU/Memory load indicator applet that will reside in your top panel.
    sudo add-apt-repository ppa:indicator-multiload/stable-daily
    sudo apt-get update
    sudo apt-get install indicator-multiload
    • After installing, just search for System Load Indicator in Unity Dash and launch the app.
    Install Dropbox Client in Ubuntu 12.04

    install dropbox ubuntu 12.04
    • Apart from Ubuntu One, Dropbox is my favorite cloud storage service. Interface is slick and Dropbox has perhaps the best Linux support among other popular alternatives. 
    • Simple double click on the downloaded .DEB package to install it.
    • Afterwards, open Dash, search for Dropbox and launch the app. The daemon will take you through the installation steps further. More screenshots and details.
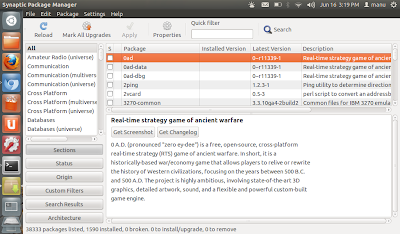
    Install Synaptic Package Manager

    install synaptic in ubuntu 12.04 lts
    • With all its bling-bling, Ubuntu Software Center is not a finished product yet. It is still very slow to respond, crashes every now and then and cannot match the functionality aspects of Synaptic Package Manager. 


    • Thanks for reading This Blog (SAGAR VASULE)