Monday, October 14, 2013

Custom Menus in Google Apps

Custom Menus in Google Apps

Scripts can extend certain Google products by adding user-interface elements that, when clicked, execute an Apps Script function. The most common example is running a script from a custom menu item in Google Docs, Sheets, or Forms, but script functions can also be triggered by clicking on images and drawings in Google Sheets, or by clicking on a link in Google Sites.

Custom menus in Google Docs, Sheets, or Forms
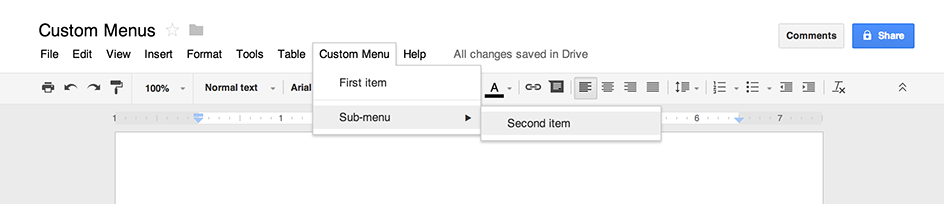
Apps Script can add new menus in Google Docs, Sheets, or Forms, with each menu item tied to a function in a script. (In Google Forms, custom menus are visible only to an editor who opens the form to modify it, not to a user who opens the form to respond.)
A script can only create a menu if it is bound to the document, spreadsheet, or form. To display the menu when the user opens a file, write the menu code within an onOpen() function.
The example below shows how to add a menu with one item, followed by a visual separator, then a sub-menu that contains another item. (Note that in Google Sheets, you must use the addMenu() syntax instead, and sub-menus are not possible.) When the user selects either menu item, a corresponding function opens an alert dialog (msgBox() in Google Sheets). For more information on the types of dialogs you can open, see the guide to dialogs and sidebars.
Google Docs or Google FormsGoogle Sheets
var ui = DocumentApp.getUi(); // Or FormApp.getUi().
function onOpen() {
  ui.createMenu('Custom Menu')
      .addItem('First item', 'menuItem1')
      .addSeparator()
      .addSubMenu(ui.createMenu('Sub-menu')
          .addItem('Second item', 'menuItem2'))
      .addToUi();
}
function menuItem1() {
  ui.alert('You clicked the first menu item!');
}
function menuItem2() {
  ui.alert('You clicked the second menu item!');
}
function onOpen() {
  var ss = SpreadsheetApp.getActive();
  var items = [
    {name: 'First item', functionName: 'menuItem1'},
    null, // Results in a line separator.
    {name: 'Second item', functionName: 'menuItem2'}
  ];
  ss.addMenu('Custom Menu', items);
}
function menuItem1() {
  Browser.msgBox('You clicked the first menu item!');
}
function menuItem2() {
  Browser.msgBox('You clicked the second menu item!');
}
A document, spreadsheet, or form can only contain one menu with a given name. If the same script or another script adds a menu with the same name, the new menu will replace the old. In Google Sheets, the method removeMenu(name) will remove a menu. In Google Docs and Forms, menus cannot be removed while the document or form is open, although you can write your onOpen() function to skip the menu in the future if a certain property is set.

Clickable images and drawings in Google Sheets
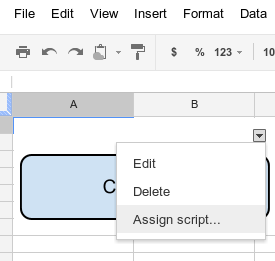
You can also assign an Apps Script function to an image or drawing in Google Sheets, so long as the script is bound to the spreadsheet. The example below shows how to set this up.
  1. In Google Sheets, select the menu item Tools > Script editor to create a script that is bound to the spreadsheet.
  2. Delete any code in the script editor and paste in the code below.
    function showMessageBox() {
      Browser.msgBox('You clicked it!');
    }
  3. Return to Sheets and insert an image or drawing by selecting Insert > Image or Insert > Drawing.
  4. After inserting the image or drawing, click it. A small drop-down menu selector will appear in the top right-hand corner. Click it and choose Assign script.
  5. In the dialog box that appears, type the name of the Apps Script function that you want to run, without parentheses — in this case,showMessageBox. Click OK.
  6. Click the image or drawing again. The function will now execute.
You can also assign an Apps Script function to a link in Google Sites, so long as the script is bound to the site. The example below shows how to set this up.
  1. In a Google Site, click More > Manage site.
  2. In the sidebar, click Apps Scripts, then Add new script to create a script that is bound to the site.
  3. Delete any code in the script editor and paste in the code below, which will send an email when the user clicks a link.
    function sitesLink() {
      var recipient = Session.getActiveUser().getEmail();
      GmailApp.sendEmail(recipient, 'Email from your site', 'You clicked a link!');
    }
  4. Return to the Google Site and edit a page. Type a label that will become a link, such as Click me, then highlight the text and select Insert > Link.
  5. In the dialog that appears, click Apps Script, then click the sitesLink function that you just created. Click OK.
  6. Click Save at the top of the page.
  7. Click the link you added to the page.
  8. A dialog box will appear and tell you that the script requires authorization. Click OK. A second dialog box will then request authorization for specific Google services. Read the notice carefully, then click Accept, then Close.
  9. Now that the script is authorized, click the link you added to the page again. The function will now execute. Check your email to see the email you sent yourself.

Creating a New Web Application & Running and Debugging using GWT & App-engine


Creating a New Web Application & Running and Debugging using GWT & App-engine 

Launching the New Web Application Wizard

To create a new project, click on the  New Web Application Project toolbar button. You can also access this wizard by selecting the Web Application Project item from the drop-down menu associated with the  New toolbar button, or by selecting File > New > Web Application Project.

Creating a Project with the New Web Application Wizard

The New Web Application Project wizard allows you to create a new web application that uses Google Web Toolkit (GWT) and/or Google App Engine:
The wizard allows you to choose a name and root package for the project. The project's name will be used when generating the names of the classes in the sample application. All of the classes will live in a subpackage of the root package.
Note: Using Java keywords as a project name (e.g. "New" and "Class") will result in various build errors. Avoid these where possible.
In the Google SDKs group box, you can choose which SDKs that you'd like to use in your Web Application. See Using SDKs for more details.
In the Identifiers for Google App Engine group box, you can choose to specify an app id or choose to leave the app id field blank. See Setting App ID in New Web Application Project wizards for more details.
Click on the Finish button to create the project.

Generated Project Structure

The sample application generated by the New Web Application Wizard will have a src/ directory for Java source files and a war/ directory for compiled classes, server runtime libraries, static content, and configuration files.
The generated files will differ depending on whether your application is using GWT, App Engine, or both. The sections below highlight the differences between the generated sample for a project named MyTestProject with a root package of com.mytestproject.
If you make a mistake and delete some of the essential resources in the war directory, don't worry! You can easily fix these problems.

GWT

These are the files that are generated for the GWT sample:
MyTestProject
  src/
    com/
      mytestproject/
        MyTestProject.gwt.xml        
        client/
          GreetingService.java
          GreetingServiceAsync.java
          MyTestProject.java      
        server/
          GreetingServiceImpl.java
  war/  
    MyTestProject.css
    MyTestProject.html
    WEB-INF/
      web.xml
      classes/
      lib/
       ...GWT JARs...         
The GWT sample application consists of a simple user interface with a single button. When you press the button, a Remote Procedure Call is performed to get the current time on the server. The results of the call are then displayed in the interface. See GWT's documentation for more information about the project's contents.

App Engine

These are the files that are generated for the App Engine sample:
MyTestProject
  src/
    log4j.properties
    META-INF/
      jdoconfig.xml
    com/
      mytestproject/
        MyTestProjectServlet.java
  war/  
    index.html
    WEB-INF/
      appengine-web.xml
      web.xml
      logging.properties
      classes/
      lib/
       ...App Engine JARs...            
The App Engine sample application consists of a servlet which prints "Hello, World!". The application also has some configuration files for deployment and logging. See App Engine's Getting Started Guide for more information about the project's structure and files.

GWT + App Engine

When using both the GWT and App Engine SDKs, the following sample application is generated:
MyTestProject
  src/
    log4j.properties
    META-INF/
      jdoconfig.xml
    com/
      mytestproject/
        MyTestProject.gwt.xml        
        client/
          GreetingService.java
          GreetingServiceAsync.java
          MyTestProject.java      
        server/
          GreetingServiceImpl.java
  war/  
    MyTestProject.css
    MyTestProject.html
    WEB-INF/
      appengine-web.xml
      web.xml
      logging.properties
      classes/
      lib/
        ...App Engine JARs...    
        ...GWT JARs... 
The GWT + App Engine sample application is similar in functionality to the GWT sample application. The main difference is that the server component is meant to run on App Engine, so the App Engine configuration files are generated as well.

Creating a Launch Configuration

If you created a project using the New Web Application Wizard, a launch configuration will have already been created for you. It can be found by navigating to the Launch Configuration dialog. Select the Run Configurations... item from the drop-down menu associated with the  Run toolbar button:
If you're interested in debugging your application, select the Debug Configurations... item from the drop-down menu associated with the  Debug toolbar button.
Tip: You can also launch your application by right-clicking the project (or an HTML or JSP page within the project) and selecting Run As/Debug As > Web Applicationfrom the context menu.
Now, expand the items underneath the Web Application category. You should see a launch configuration with a name matching your project name. Click on the launch configuration.
Notice that the Web Application launch configuration has the Main, Server, GWT, App Engine, and Arguments tabs. The Main tab allows you to choose the project that is associated with the launch configuration and change the main class for the launch. The Server tab allows you to choose a different port for the built-in server. In general, you'll want to run the built-in server, unless you have a specific server instance that you want to test against.

GWT Settings

The GWT settings tab contains the GWT settings for the launch configuration.
In addition to customizing the log level, you can also tweak the set of Available Modules for the launch. All modules you want to access during the Development Mode launch must be included in this list (excluding any inherited modules). The actual set of modules that will be loaded at startup will be determined by the HTML page you launch with (more on this later).

Additional Arguments

If you need to change settings that are not represented on the Main, Server, GWT, or App Engine tabs, you can switch to the Arguments tab and enter them alongside the computed arguments.

Running the Launch Configuration

To launch the web application, click on the Run button in the lower-right corner of the Run Configurations dialog. You can also run your application via context menu shortcuts. To do this, select either a project, a GWT Module file, or an HTML/JSP page in the project's WAR directory. Then, run the application by navigating to Run As > Web Application. Notice that after you run the launch configuration, it will appear in the Run shortcut list:

GWT and GWT + App Engine Applications

If your project uses GWT, the development mode view will appear shortly after launching the application:
Notice that your launch configuration is listed in the view, along with some suggested URLs to start up your GWT application. Copy the URL for your application into the browser's address bar by selecting the entry and choosing Copy from the context menu. Once you have navigated to the startup URL in your browser, you'll notice that a browser entry will be added to the launch configuration:
After a few seconds, you'll notice that loading messages for the GWT modules in your application will appear in the view, indicating that your GWT Application is starting up. Finally, you'll see your application appear in the browser window.
The development mode view is useful for troubleshooting problems with your GWT application. By turning up the log level for the launch configuration, you can see more detailed information about your application's execution. You can search for text within a log by using the filter text field.
When using the view, don't forget about the view's toolbar, which can be used to switch the layout of the view, terminate a launch, clear terminated launch configurations, and restart the embedded web server. The alternate layout presents the launch configurations and browsers in a tree, with browsers as children of their associated launch configuration.
If your project uses Google App Engine and GWT, the only difference is that the embedded server is actually the Google App Engine development server.
Note: If your application uses GWT and you make change to your code during a debugging session, you may need to click Refresh in your browser or Restart Server in the development mode view. See the GWT documentation on development mode debugging for more details.

App Engine-only Applications

If your application uses App Engine but not GWT, the only indication that the App Engine development server is running will be output in the Console view. App Engine-only launches will not appear in the development mode view. The console output includes the URL of the server, which by default is http://localhost:8888/. You can change the port number via Eclipse's launch configuration dialog by selecting your Web Application launch and editing the Port value on the Main tab.
If you open a web browser and navigate to the server's address you should see a welcome page with links to any servlets defined by the application.

Developing Apps Script Projects in Eclipse


Developing Apps Script Projects in Eclipse

Installation
Usage
Importing a Project
Working with Projects
Autocomplete
Limitations
  • Creating a new project in Eclipse is not supported. You can only import existing projects.
  • Renaming the project in your workspace does not rename it in the script editor or Google Drive.
  • All .gs and .html files that are to be saved back to Google Drive must be in the project's root folder. Other types of files, and files in subfolders of the Eclipse project, are not considered to be part of the Apps Script project on Google Drive.
  • Autocomplete suggestions are not provided for libraries or advanced Google services.
  • Autocomplete may not always reflect the methods most recently added to Apps Script. Any code valid in the script editor will still run correctly.

The Google Plugin for Eclipse allows developers to import existing standalone Apps Script projects from Google Drive into a new Eclipse project. Scripts and HTML files in the project can be edited in Eclipse. When they are saved in the local Eclipse file system, the corresponding files are also updated on Google Drive.
The Google Plugin for Eclipse uses the publicly released Apps Script Import/Export API to integrate with Apps Script projects.
We recommend that Apps Script developers also install the JavaScript Development Tools to get the JavaScript editor perspective.
You will first need to sign in by clicking Sign in to Google in the bottom-left corner of Eclipse. After you've signed in, you can import an existing Apps Script project from Google Drive into your local workspace.
To get started with a project, select File > Import, then select Apps Script Project under the Google group.
 
The Apps Script Project Import Wizard will then load and display all the projects that appear in your My Drive view. You can import projects for which you only have View access, but you will not be able to save those projects back to Google Drive.
You can work with Apps Script projects just like normal JavaScript projects, including integration with your existing source-control system and the wide variety of JavaScript tools that Eclipse provides. Changes to your files are synchronized with Google Drive upon saving, assuming you have an Internet connection.
To create a new file in your project, use the File > New File menu option to bring up the New File dialog. In this dialog, select the project where you want the file created and give it a name to create the file. When you name the file, ensure you use the correct file extension; as in the script editor, only .gs and .html files are supported.
The Google Plugin for Eclipse includes the same autocomplete data as the script editor. When editing a file, press Ctrl+Space to see completion suggestions.
Suggestions for method calls are offered automatically as soon as you type a period in the appropriate context.
Since the Apps Script support for the Google Plugin for Eclipse is built with the public Google Drive API, the same limitations documented for the Import/Export API apply.
A few other limitations to be aware of while using the Google Plugin for Eclipse with Apps Script projects:

Sunday, September 1, 2013

How to Install PuTTY & How to Use..SSH client for Windows.


How to Install PuTTY & How to Use..SSH client for Windows.
PuTTY is a popular free SSH client for Windows. 
How to Install PuTTy.......

Download the PuTTY Installer

Make sure you grab the latest stable release under the headers Binaries/A Windows installer for everything except PuTTYtel and will be named similar to putty-0.62-installer.exe.

Running the Installer

After you have installer downloaded open up the folder you downloaded it to in the File Explorer and double click on the icon to run the installer.
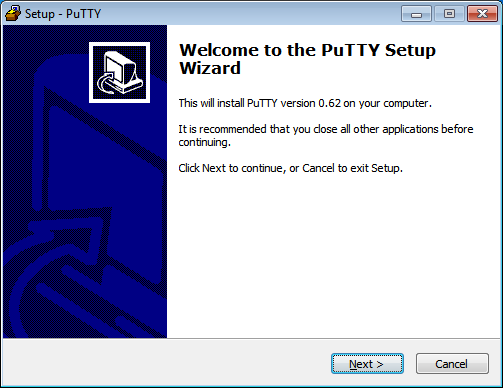
Step 1: You will be greeted by the Welcome dialog. You may click the Next > button to continue
Wizard Step 1: Welcome
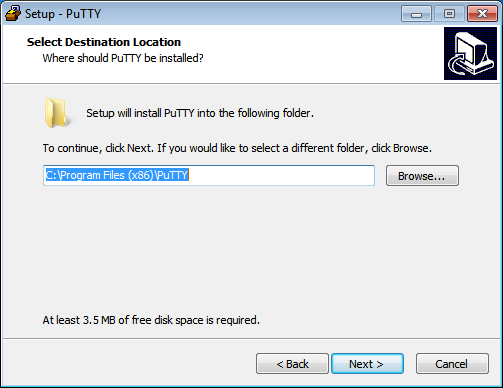
Step 2: The wizard will ask you to select a directory to install PuTTY to. You should use the default and click the Next > button to continue.
Wizard Step 2: Select install directory
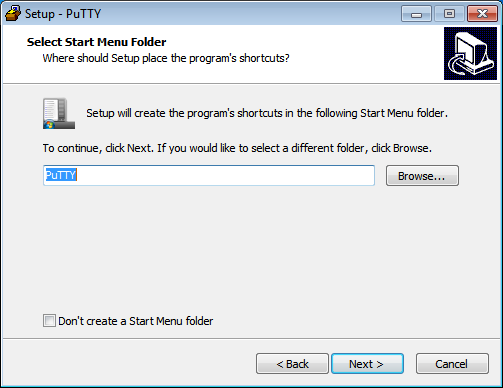
Step 3: The wizard will ask which folder you wish to put PuTTY into on the Start Menu. You should use the default and click the Next > button to continue.
Wizard Step 3: Start Menu location
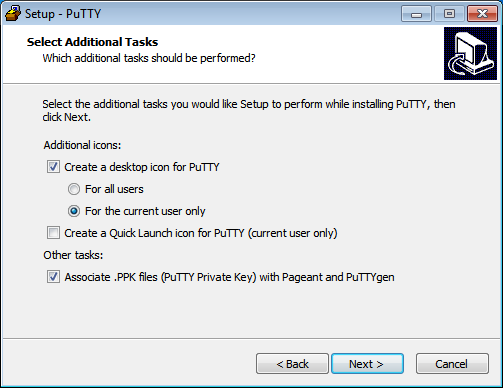
Step 4: You will be asked addtional questions. You can choose to have an icon placed on your desktop or on the Panel as a quick start button for easier access to PuTTY if you wish. It is recommended that you keep the option for associating .ppk files checked. You may click the Next > button to continue.
Wizard Step 4: Additional options
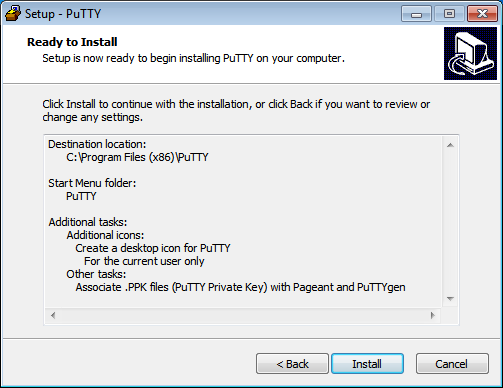
Step 5: PuTTY is now ready to install. You may click the Install button to start the installation process.
Wizard Step 5: Install
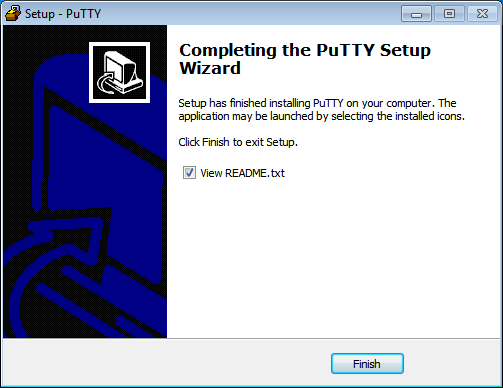
Step 6: You are now down and may click the Finish button to exit the installer. It is recommended that you read the README file for further information about PuTTY.
Wizard Step 6: Finish

Importing Your SSH Key

It is assumed that you have already gone through the steps to create an SSH key to be used with OpenShift. You may now import that key for use with PuTTY.
Step 1: Launch PuTTYgen
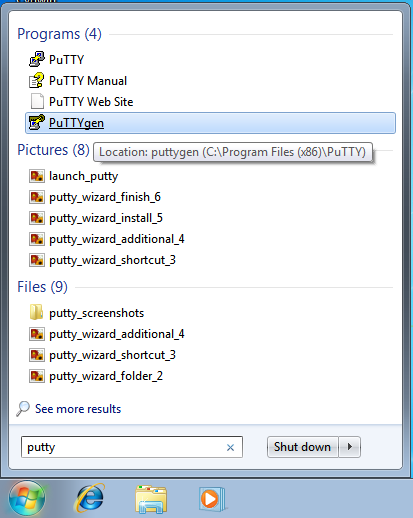
You need to launch PuTTYgen, the PuTTY key manager. From the Start Menu type in putty in the search box. A list of putty applications will show up. Click on PuTTYgen. On older versions of Windows navigate to the PuTTY folder and launch it from there.
Import SSH Key Step 1: Launch PuTTYGen
Step 2: Import the SSH Key
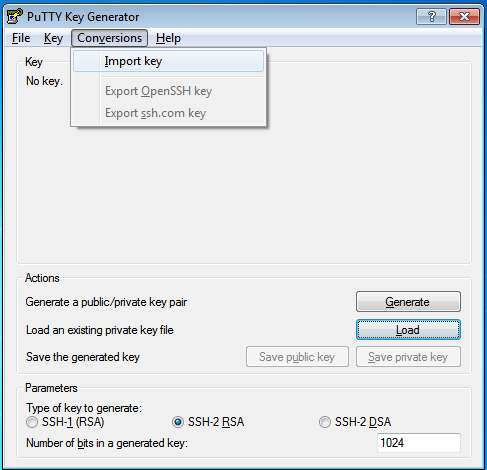
Once PuTTYgen is started go to the Conversions menu and select the Import key item.
Import SSH Key Step 2: Select Import key menu item
Step 3: Select the SSH Key for Import
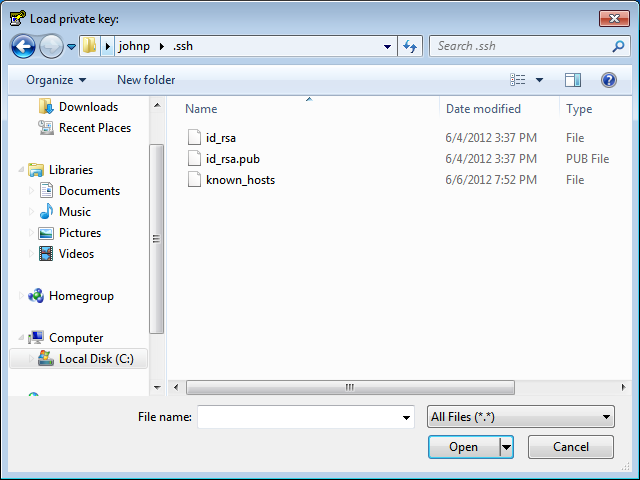
A file dialog should pop up. Navigate to the .ssh directory in your user folder C:\Users\<user name>\.ssh and select the id_rsa key that was generated for you by rhc setup.
Import SSH Key Step 3: Select your private key
Step 4: Save the Private Key as a .PPK File
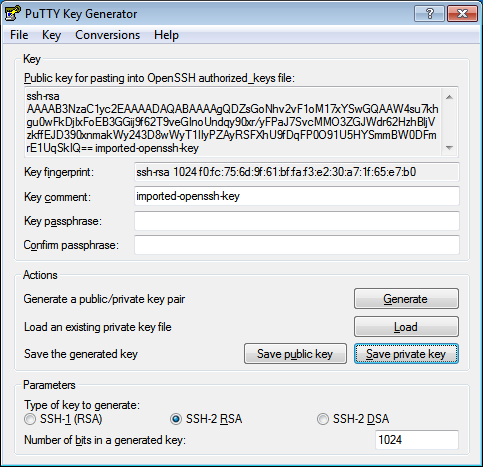
PuTTYgen will load your key and display it. In this dialog press the Save private key button.
Import SSH Key Step 4: Save your private key
Step 5: Select a Key Name
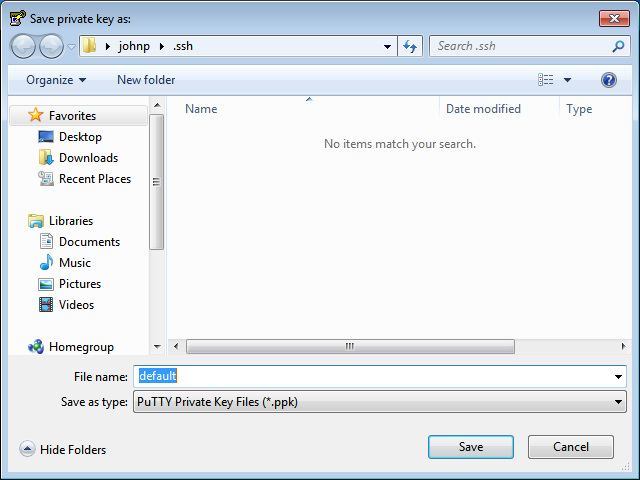
Another file dialog will pop up for you to select where to save the key. Again navigate to the .ssh directory in your user folder C:\Users\<user name>\.ssh. Name the key whatever you wish but make sure you do not overwrite any files in this directory. Good names to use are default.ppk or id_rsa.ppk.
Import SSH Key Step 5: Select a key name
You are now done with importing your SSH key and may close the PuTTYgen application.

Configuring a Session to Connect to Your Application

It is assumed that you have already created an application on OpenShift at this point and want to configure PuTTY so you can easily ssh to it.
Step 1: Launch PuTTY
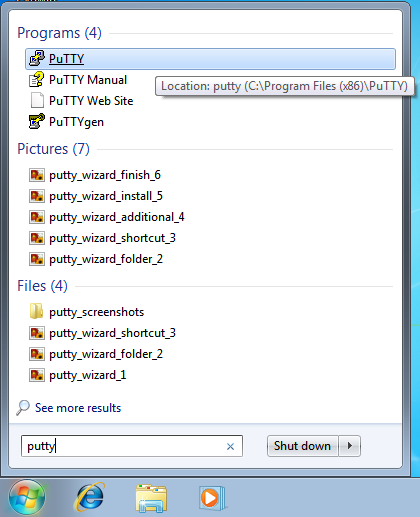
If you selected the option to put an icon on the desktop or a button the start menu you may launch PuTTY from there. Otherwise, click on the start menu and in the search box type in putty. Select the PuTTY application to run. On older versions of windows you may need to navigate to the PuTTY directory in the Start Menu and launch it from there.
Configure a PuTTY Session Step 1: Launch PuTTY
Step 2: Get the SSH Address
You need to get the ssh address to enter into PuTTY. The easiest way to find the SSH address is to go to the applications list page in the web console and click on your application to go to the details page. Once on the details page you can click on the Want to log in to your application? link to expand the text. This text includes the ssh command and the address. In the next step you will want to copy this text but remove the ssh command from the front of the string.
Configure a PuTTY Session Step 2: Get the SSH address
Step 3: Enter the Address into PuTTY
In the Session category, under the Host Name form past the text you copied from the previous step, remembering to remove the ssh command from the begining of the string.
Configure a PuTTY Session Step 3: End the Address into PuTTY
Step 4: Associate Your SSH Key with the Session
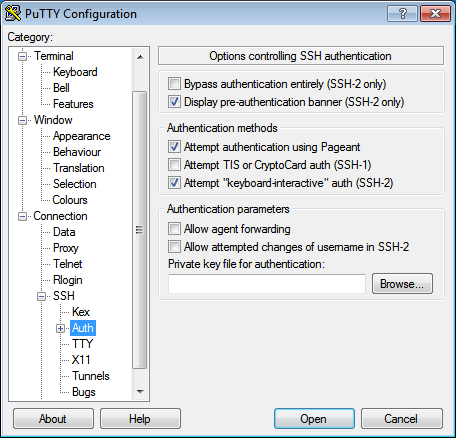
In the Category tree, expand the Connection and then SSH categories and select Auth. Here click on the Browse button and when the file dialog pops up, again navigate to the.ssh directory in your user folder C:\Users\<user name>\.ssh and select the .ppk file you saved there.
Configure a PuTTY Session Step 4: Associate the ssh key
Step 5: Save Your Session
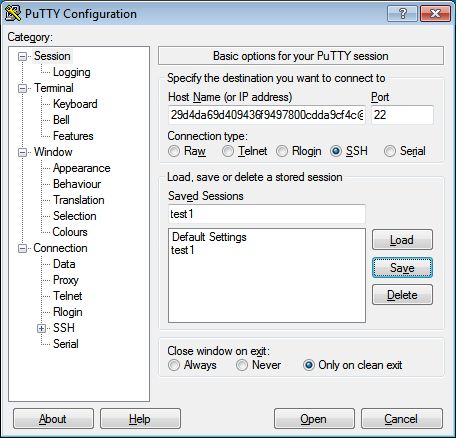
In the Category tree go back to the Session category. In the Saved Sessions form name your session. We recommend using the name of your application. Click the save button and you should see it pop up in the list.
Click the Open button to connect to your application.
Now whenever you wish to connect to your app you can simply select your session in the list. Click on the Load button and then click on the Open button.
Configure a PuTTY Session Step 5: Save your session
Go back to the SSH page for more information on the commands you can use inside of an SSH session.

Friday, August 16, 2013

Penetration Testing – Complete Guide with Sample Test Cases

Penetration Testing – Complete Guide with Sample Test Cases

What is Penetration Testing?
It’s the process to identify security vulnerabilities in an application by evaluating the system or network with various malicious techniques. Purpose of this test is to secure important data from outsiders like hackers who can have unauthorized access to system. Once vulnerability is identified it is used to exploit system in order to gain access to sensitive information.
Causes of vulnerabilities:
- Design and development errors
- Poor system configuration
- Human errors

Why Penetration testing?

- Financial data must be secured while transferring between different systems
- Many clients are asking for pen testing as part of the software release cycle
- To secure user data
- To find security vulnerabilities in an application
It’s very important for any organization to identify security issues present in internal network and computers. Using this information organization can plan defense against any hacking attempt. User privacy and data security are the biggest concerns nowadays. Imagine if any hacker manage to get user details of social networking site like Facebook. Organization can face legal issues due to a small loophole left in a software system. Hence big organizations are looking for PCI compliance certifications before doing any business with third party clients.
What should be tested?
- Software
- Hardware
- Network
- Process

Penetration Testing Types:

1) Social Engineering: Human errors are the main causes of security vulnerability. Security standards and policies should be followed by all staff members to avoid social engineering penetration attempt. Example of these standards include not to mention any sensitive information in email or phone communication. Security audits can be conducted to identify and correct process flaws.
2) Application Security Testing: Using software methods one can verify if the system is exposed to security vulnerabilities.
3) Physical Penetration Test: Strong physical security methods are applied to protect sensitive data. This is generally useful in military and government facilities. All physical network devices and access points are tested for possibilities of any security breach.
Pen Testing Techniques:
1) Manual penetration test
2) Using automated penetration test tools
3) Combination of both manual and automated process
The third process is more common to identify all kinds of vulnerabilities.

Penetration Testing Tools:

Automated tools can be used to identify some standard vulnerability present in an application. Pentest tools scan code to check if there is malicious code present which can lead to potential security breach. Pentest tools can verify security loopholes present in the system like data encryption techniques and hard coded values like username and password.
Criteria to select the best penetration tool:
- It should be easy to deploy, configure and use.
- It should scan your system easily.
- It should categorize vulnerabilities based on severity that needs immediate fix.
- It should be able to automate verification of vulnerabilities.
- It should re-verify exploits found previously.
- It should generate detailed vulnerability reports and logs.
Once you know what tests you need to perform you can either train your internal test resources or hire expert consultants to do the penetration task for you.
Manual Penetration Test:
It’s difficult to find all vulnerabilities using automated tools. There are some vulnerabilities which can be identified by manual scan only. Penetration testers can perform better attacks on application based on their skills and knowledge of system being penetrated. The methods like social engineering can be done by humans only. Manual checking includes design, business logic as well as code verification.
Penetration Test Process:
Let’s discuss the actual process followed by test agencies or penetration testers. Identifying vulnerabilities present in system is the first important step in this process. Corrective action is taken on these vulnerability and same penetration tests are repeated until system is negative to all those tests.
We can categorize this process in following methods:
1) Data collection: Various methods including Google search are used to get target system data. One can also use web page source code analysis technique to get more info about the system, software and plugin versions. There are many free tools and services available in the market which can give you information like database or table names, DB versions, software versions, hardware used and various third party plugins used in the target system.
2) Vulnerability Assessment: Based on the data collected in first step one can find the security weakness in the target system. This helps penetration testers to launch attacks using identified entry points in the system.
3) Actual Exploit: This is crucial step. It requires special skills and techniques to launch attack on target system. Experienced penetration testers can use their skills to launch attack on the system.
4) Result analysis and report preparation: After completion of penetration tests detailed reports are prepared for taking corrective actions. All identified vulnerabilities and recommended corrective methods are listed in these reports. You can customize vulnerability report format (HTML, XML, MS Word or PDF) as per your organization needs.

Penetration testing sample test cases (test scenarios):

Remember this is not functional testing. In Pentest your goal is to find security holes in the system. Below are some generic test cases and not necessarily applicable for all applications.
1) Check if web application is able to identify spam attacks on contact forms used in the website.
2) Proxy server – Check if network traffic is monitored by proxy appliances. Proxy server make it difficult for hackers to get internal details of the network thus protecting the system from external attacks.
3) Spam email filters – Verify if incoming and outgoing email traffic is filtered and unsolicited  emails are blocked. Many email clients come with in-build spam filters which needs to be configured as per your needs. These configuration rules can be applied on email headers, subject or body.
4) Firewall – Make sure entire network or computers are protected with Firewall. Firewall can be a software or hardware to block unauthorized access to system. Firewall can prevent sending data outside the network without your permission.
5) Try to exploit all servers, desktop systems, printers and network devices.
6) Verify that all usernames and passwords are encrypted and transferred over secured connection like https.
7) Verify information stored in website cookies. It should not be in readable format.
8 ) Verify previously found vulnerabilities to check if the fix is working.
9) Verify if there is no open port in network.
11) Verify all telephone devices.
12) Verify WIFI network security.
13) Verify all HTTP methods. PUT and Delete methods should not be enabled on web server .
14) Password should be at least 8 character long containing at least one number and one special character.
15) Username should not be like “admin” or “administrator”.
16) Application login page should be locked upon few unsuccessful login attempts.
17) Error messages should be generic and should not mention specific error details like “Invalid username” or “Invalid password”.
19) Verify if special characters, html tags and scripts are handled properly as an input value.
20) Internal system details should not be revealed in any of the error or alert messages.
21) Custom error messages should be displayed to end user in case of web page crash.
22) Verify use of registry entries. Sensitive information should not be kept in registry.
23) All files must be scanned before uploading to server.
24) Sensitive data should not be passed in urls while communicating with different internal modules of the web application.
25) There should not be any hard coded username or password in the system.
26) Verify all input fields with long input string with and without spaces.
27) Verify if reset password functionality is secure.
28) Verify application for SQL Injection.
29) Verify application for Cross Site Scripting.
31) Important input validations should be done at server side instead of JavaScript checks at client side.
32) Critical resources in the system should be available to authorized persons and services only.
33) All access logs should be maintained with proper access permissions.
34) Verify user session ends upon log off.
35) Verify that directory browsing is disabled on server.
36) Verify that all applications and database versions are up to date.
37) Verify url manipulation to check if web application is not showing any unwanted information.
38) Verify memory leak and buffer overflow.
39) Verify if incoming network traffic is scanned to find Trojan attacks.
40) Verify if system is safe from Brute Force Attacks – a trial and error method to find sensitive information like passwords.
41) Verify if system or network is secured from DoS (denial-of-service) attacks. Hacker can target network or single computer with continuous requests due to which resources on target system gets overloaded resulting in denial of service for legit requests.
These are just the basic test scenarios to get started with Pentest. There are hundreds of advanced penetration methods which can be done either manually or with the help of automation tools.

<a href="http://www.webstatsdomain.net/domains/sagarvasule.blogspot.com/" target="_blank"><img src="http://www.webstatsdomain.net/widget/informer/sagarvasule.blogspot.com/1.png" alt="sagarvasule.blogspot.com-Google pagerank and Worth" title="sagarvasule.blogspot.com-Google pagerank and Worth" style="border:none;"/></a>

Wednesday, July 24, 2013

What is SSL "Secure Sockets Layer" & SSH "Secure Shell"

SSL stands for "Secure Sockets Layer". It commonly uses port 443 to connect your computer to a secure server on the Internet. SSL is most often used for transmitting credit card, tax, banking, or personal information to a business server somewhere. Examples of SSL: you are purchasing a DVD from Amazon.com, you are filing your taxes online, or you are transferring funds between your checking and savings accounts.

SSH stands for "Secure Shell". SSH commonly uses port 22 to connect your computer to another computer on the Internet. It is most often used by network administrators as a remote login / remote control way to manage their business servers. Examples would be: your email administrator needs to reboot the company email server from his home, or your network administrator needs to reset your office password while she is away at a conference.

Both SSL and SSH strive to create confidential connections across the Net. With only a very few exceptions, it is not possible for a regular hacker to break into an SSL or SSH connection...the encryption technology is as reliable as 21st century programming can make it. 

When you are trying to transmit financial information or internal business documentation, it is highly advisable that you only do so with an SSL or SSH type of connection.

Both SSL and SSH are special encryption and protocol technologies used to connect two computers. SSL and SSH lock out eavesdroppers by encrypting (ciphering) the connection, and scrambling the transmitted data so it is meaningless to anyone outside of the two computers.


Sagar Vasule

Wednesday, May 22, 2013

Information form Memory storage

Till which byte you know?
1 Bit = Binary Digit
8 Bits = 1 Byte
1024 Bytes = 1 Kilobyte
1024 Kilobytes = 1 Megabyte
1024 Megabytes = 1 Gigabyte
1024 Gigabytes = 1 Terabyte
1024 Terabytes = 1 Petabyte
1024 Petabytes = 1 Exabyte
1024 Exabytes = 1 Zettabyte
1024 Zettabytes = 1 Yottabyte
1024Yottabytes = 1 Brontobyte
1024 Brontobytes = 1 Geopbyte
1024 Geopbyte=1 Saganbyte
1024 Saganbyte=1 Pijabyte
Alphabyte = 1024 Pijabyte
Kryatbyte = 1024 Alphabyte
Amosbyte = 1024 Kryatbyte
Pectrolbyte = 1024 Amosbyte
Bolgerbyte = 1024 Pectrolbyte
Sambobyte = 1024 Bolgerbyte
Quesabyte = 1024 Sambobyte
Kinsabyte = 1024 Quesabyte
Rutherbyte = 1024 Kinsabyte
Dubnibyte = 1024 Rutherbyte
Seaborgbyte = 1024 Dubnibyte
Bohrbyte = 1024 Seaborgbyte
Hassiubyte = 1024 Bohrbyte
Meitnerbyte = 1024 Hassiubyte
Darmstadbyte = 1024 Meitnerbyte
Roentbyte = 1024 Darmstadbyte
Coperbyte = 1024 Roentbyte...